Introduction
In this article I’ll show you how to use TypeScript to develop client-side components faster while improving the quality of your code. When talking about client-side components I refer to :
- Libraries that can be used in form events (onload, onsave, onchange) or with actions (custom button)
- View Functions
- HTML Web Resources (we’ll see that specific use case in a future post)
Of course you can use TypeScript when developing PCF components (which is strongly recommended by the way) but a PCF project is already setup to use TypeScript so I don’t really see the point of covering that use case here.
If you are wondering what are the main benefits of using TypeScript you should probably start by reading the main page of the TypeScript website. If I had to summarize I would list the following points:
- By adding types to JavaScript you will find small bugs in your existing code that would have been difficult to pinpoint otherwise.
- Declaration files improves your efficiency by providing IntelliSense in Visual Studio and Visual Studio Code when using your code or external libraries.
This article is split in three parts:
- Part 1 : creating a TypeScript project to create a basic JavaScript Web Resource
- Part 2 : adding WebPack to the project to include external libraries
- Part 3 : using our project to develop HTML Web Resources with React
I think this is easier to digest and understand than posting one single article that would describe the final recipe. Through those three articles we’ll add more features to the project to finally be able to develop any type of Dynamics 365 / Model-Driven App client-side component at the exception of PCF controls. If you’re new to TypeScript development I would strongly encourage you to go through those articles while an experienced developer could jump to the last part, download the sample and figure out how it works.
The code of the sample project can be found here.
Creating the project
First we have to setup our working environment. We’ll create a folder on our filesystem and initialize the package.json file that will help up describe our project and keep track of the required dependencies. Of course you can use any name you want for your project. In my case that will be “samples-webresx-ts“.
mkdir samples-webresx-ts
cd samples-webresx-ts
npm init
We’ll keep the default answers when running npm init. Then we’ll open the workspace with Visual Studio code. Since we already have a terminal open in that folder we can use the following command:
code .Now let’s modify the package.json file to avoid publishing our code by mistake to npmjs by adding the private flag. We’ll remove the main entry while we’re at it.
{
  "name": "samples-webresx-ts-part1",
  "version": "1.0.0",
  "description": "TypeScript project to show how to develop a basic Web Resource",
  "private": true,
  "main": "index.js",
  ...
}
Even if you’re not using a git repository now I strongly suggest you to add a .gitignore file in case you decide to push your code to a repo afterwards. That file will exclude the node_modules and dist folders (we’ll generate our code in dist). Create a .gitignore file at the root of your project and add the following line:
node_modules/
dist/
Adding TypeScript
Let’s add TypeScript to our project by adding the corresponding dependency. In a terminal we’ll use the following command:
npm i --save-dev typescriptThen, add a tsconfig.json file in the project’s root folder with the following content:
{
    "compilerOptions": {
        "outDir": "dist",
        "target": "ES6",
    },
    "include": [
        "src/**/*"
    ]
}
Here are more details if you’re not familiar with TypeScript:
- outDir: project relative path where the transpiled files will be generated.
- target: corresponds to the supported browsers you want to target. Most modern browsers now supports ES6 so it’s a good choice.
- include: specifies the files to transpile from TypeScript to JavaScript. We’ll include all the files in the src directory that we’ll create in the next step.
Coding (finally)
It’s finally time to add some code to our project. First, create a src folder in our project and add a contactForm.ts file inside it:
function onContactFormLoad(executionContext) {

    // We'll add some code here.
}
If you try to replace the comment in the file above by some code referencing the Client API object model you’ll miss the IntelliSense. That’s quite unfortunate since this is one the main benefits of using TypeScript. So let’s fix that by importing the corresponding types to our project thanks to the following command:
npm i --save-dev @types/xrmNote: if you’re not familiar with declaration files in TypeScript and the Definitively Typed repository I’d strongly encourage you clicking on those links to learn more.
Now we have to specify the type of the onContactFormLoad function argument. We’ll update the code like this:
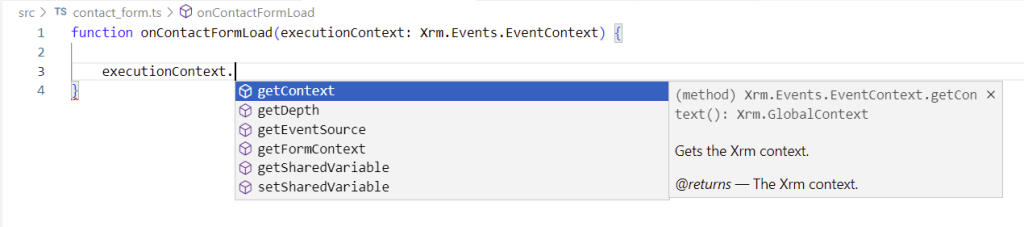
function onContactFormLoad(executionContext: Xrm.Events.EventContext) {

    // We'll add some code here.
}
You should now see the IntelliSense when accessing the properties of the executionContext object:
For now our Web Resource doesn’t do anything interesting so we’ll add some basic code for testing purposes:
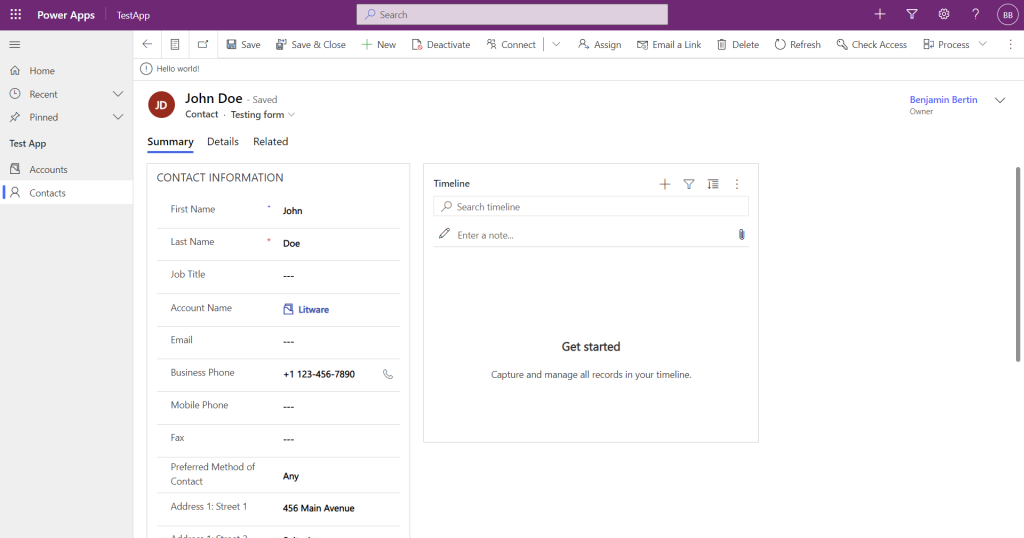
function onContactFormLoad(executionContext: Xrm.Events.EventContext) {

    const formContext = executionContext.getFormContext();
    formContext.ui.setFormNotification('Hello world!', 'INFO', 'www_contactform_notification');
}
Note: I strongly encourage you to type this code instead of just copying / pasting it to enjoy the IntelliSense. I really like the list of values that is displayed when typing the notification level for example.
Transpiling
Our code is now ready to be transpiled to plain JavaScript. We can use the npx tsc command but since our project is a npm package it’s a good practice to add edit the scripts section in the package.json file as follow:
{
  ...
  "scripts": {
    "test": "echo \"Error: no test specified\" && exit 1",
    "build": "tsc"
  },
  ...
}
You can now transpile the TypeScript code thanks to the following command:
npm run buildA contactForm.js file should have been created in the dist folder. This is the file we’ll upload as a Web Resource in our Dataverse environment.
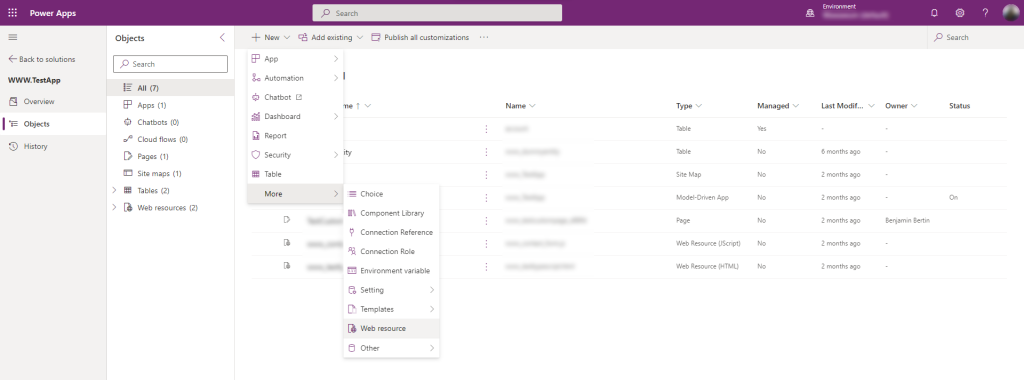
Testing the Web Resource
Testing the Web Resource is quite simple. We’ll just upload our contactForm.js file to a Dataverse environment and add it as a library in a form.
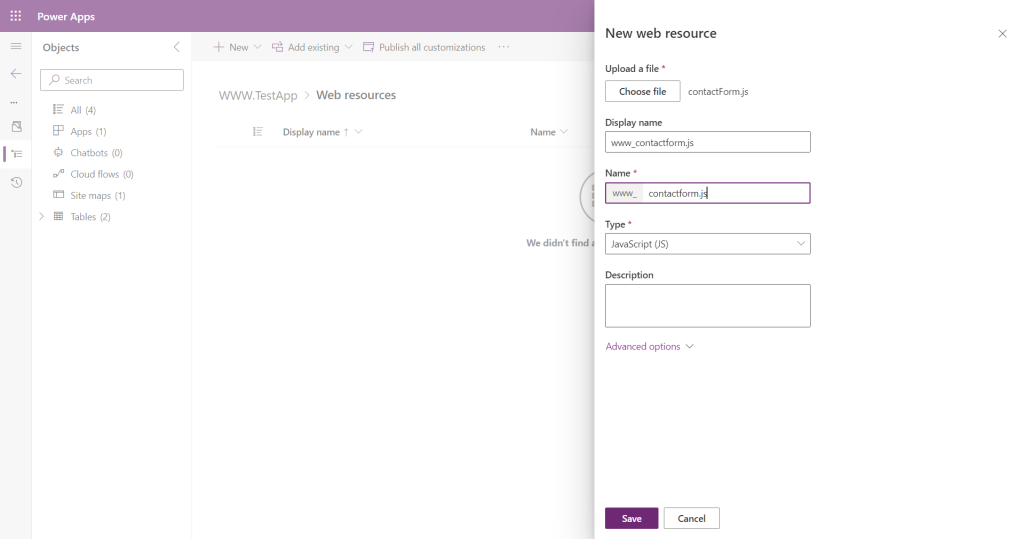
Don’t forget to publish the Web resource after creating it (select the Web resource and click on Publish in the Command bar).
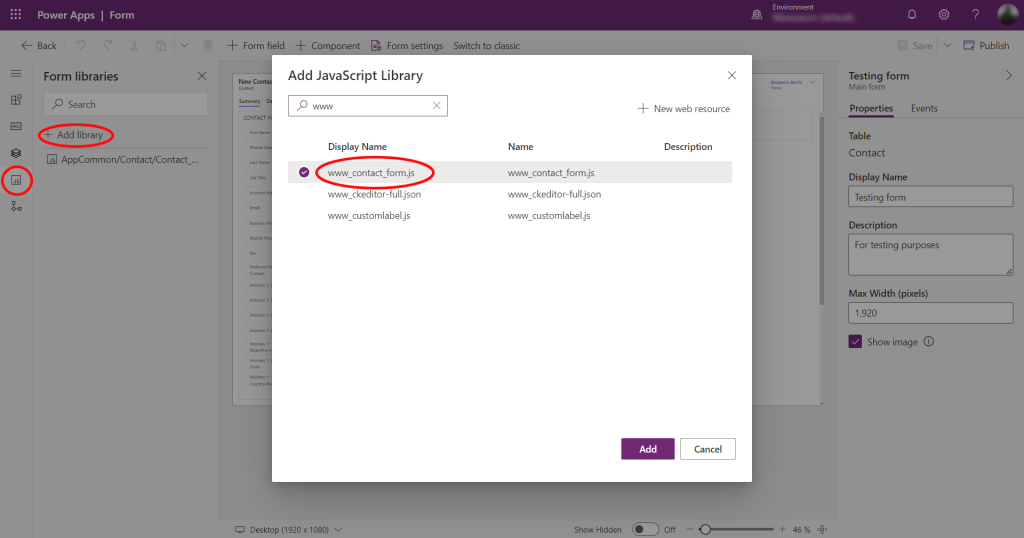
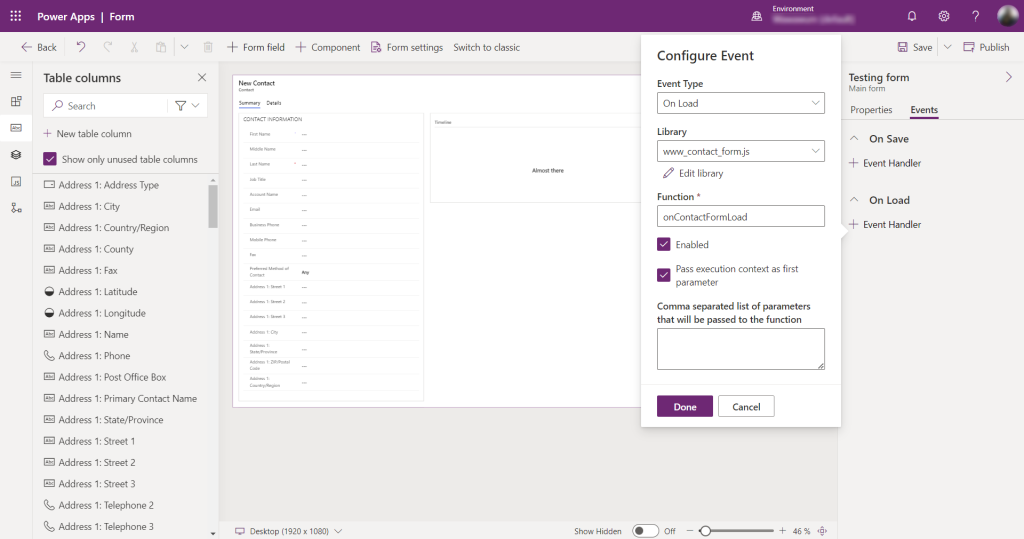
Don’t forget to save and publish your changes before opening the form. Then you should see the notification displayed in the form.
Conclusion
That concludes the part 1 of this series. I know setting up the project may seem quite complex especially to do such a simple thing as displaying a notification in a form. Nonetheless, let’s not focus on the code here. What matters is the fact we now have a working project. Thanks to TypeScript we can develop in more efficient way thanks to the IntelliSense and increase the quality of our code thanks to type checking.
I’ve been using TypeScript in several Model-Driven App / Dynamics 365 projects and I can assure you it really is a game changer while developing client-side components. It really speeds-up the process once the project is in place and reduces the number of bugs.
Stay tuned for the second part of this series in which we’ll see how to include third-party libraries in our project.